devbits
SwiftUI is the new hotness right now, however not everyone is willing or able to go 'all in' on it just yet. For those of us still working away under UIKit, I wanted to share a technique I have been using for a while now to deal with constructing a UI hierarchy and managing navigation.
You've likely all heard about, and possibly tried, Coordinators, a fantastic pattern by Soroush Khanlou. I used this pattern myself for a long time. It solved the problem of decoupling navigation from View Controllers so that they could potentially be reused under any number of different scenarios.
As I used this pattern more and more I would often feel some recurring, nagging, issues. I began to notice things like:
The more I thought about this I began to realize that each Coordinator not only managed a specific Container Controller but that it's behaviour ended up copying its Containers behaviour. It felt like I was reinventing something that already existed over and over. Navigation based Coordinators ended up mostly pushing things. Tab based Coordinators were mostly managing an array of child Coordinators.
I was essentially writing Coordinators to do the jobs that the UIKit Containers already do 🤔
I decided to try subclassing Containers to act as Coordinators, and once I did something pretty cool happened...
UINavigationController. If I needed a tab based one I could subclass UITabBarController and load it up with my UINavigationController subclasses.I now found I was able to build each Coordinator, in isolation, and not have to think about how it interacted with other Coordinators.
Consider a simple app with a couple of tabs. A tab with a list of friends and a tab with a list of messages between you and those friends. Let's look at what this might look like using Containers as Coordinators.
First we have our View Controllers for the lists of friends and messages:
class FriendListViewController: UITableViewController {
  //..
}
class MessageListViewController: UITableViewController {
  //..
}
We know that we will want stack based navigation for each tab so let's build our UINavigationController subclasses for each of them:
class FriendListNavigationController: UINavigationController {
  init() {
    super.init(nibName: nil, bundle: nil)

    let viewController = FriendListViewController()
    viewController.title = "Friends"
    setViewControllers([viewController], animated: false)
  }
}

class MessageListNavigationController: UINavigationController {
  init() {
    super.init(nibName: nil, bundle: nil)

    let viewController = MessageListViewController()
    viewController.title = "Messages"
    setViewControllers([viewController], animated: false)
  }
}
Finally let's create our UITabBarController subclass to manage these:
class HomeTabController: UITabBarController {
  init() {
    super.init(nibName: nil, bundle: nil)

    let users = FriendListNavigationController()
    users.tabBarItem = .init(title: "Users", image: nil, selectedImage: nil)

    let messages = MessageListNavigationController()
    messages.tabBarItem = .init(title: "Messages", image: nil, selectedImage: nil)

    setViewControllers([users, messages], animated: false)
  }
}
If we now compose all of these layers together at run time we end up with an application that looks something like:
| Friends Tab | Messages Tab |
|---|---|
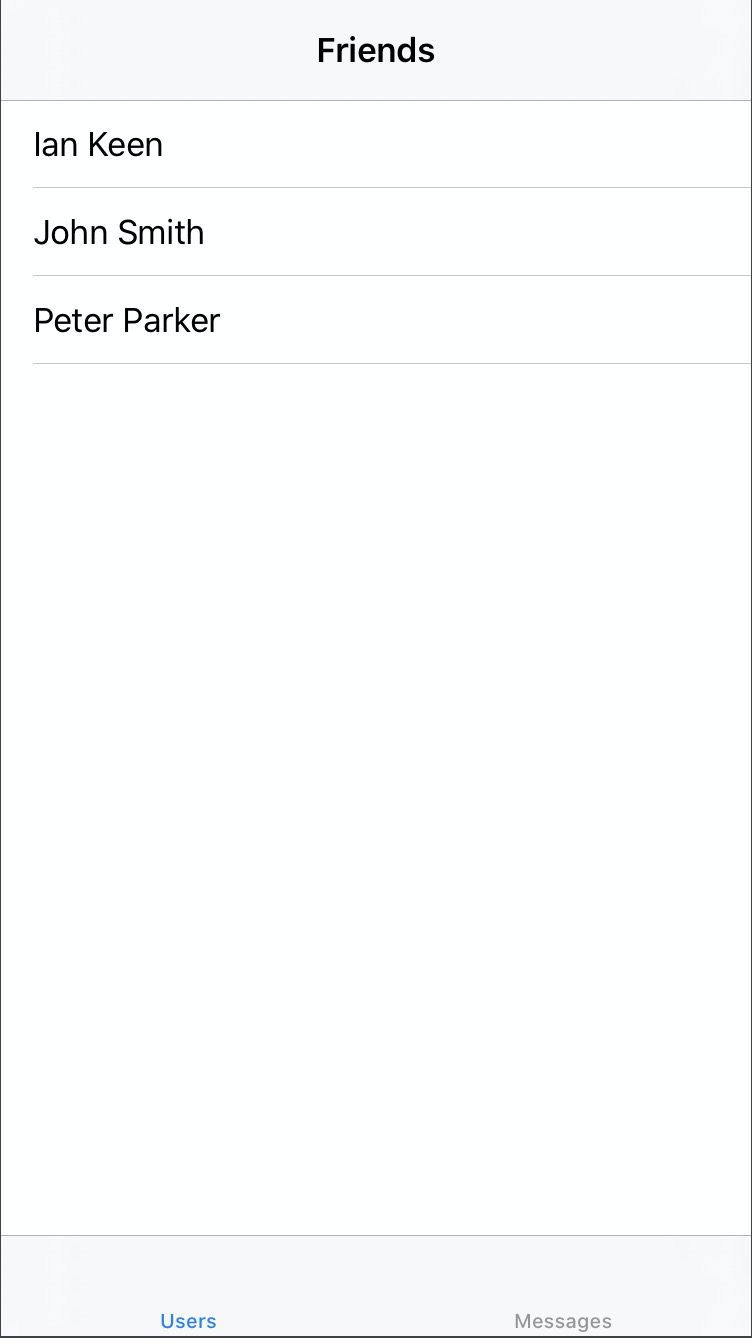 | 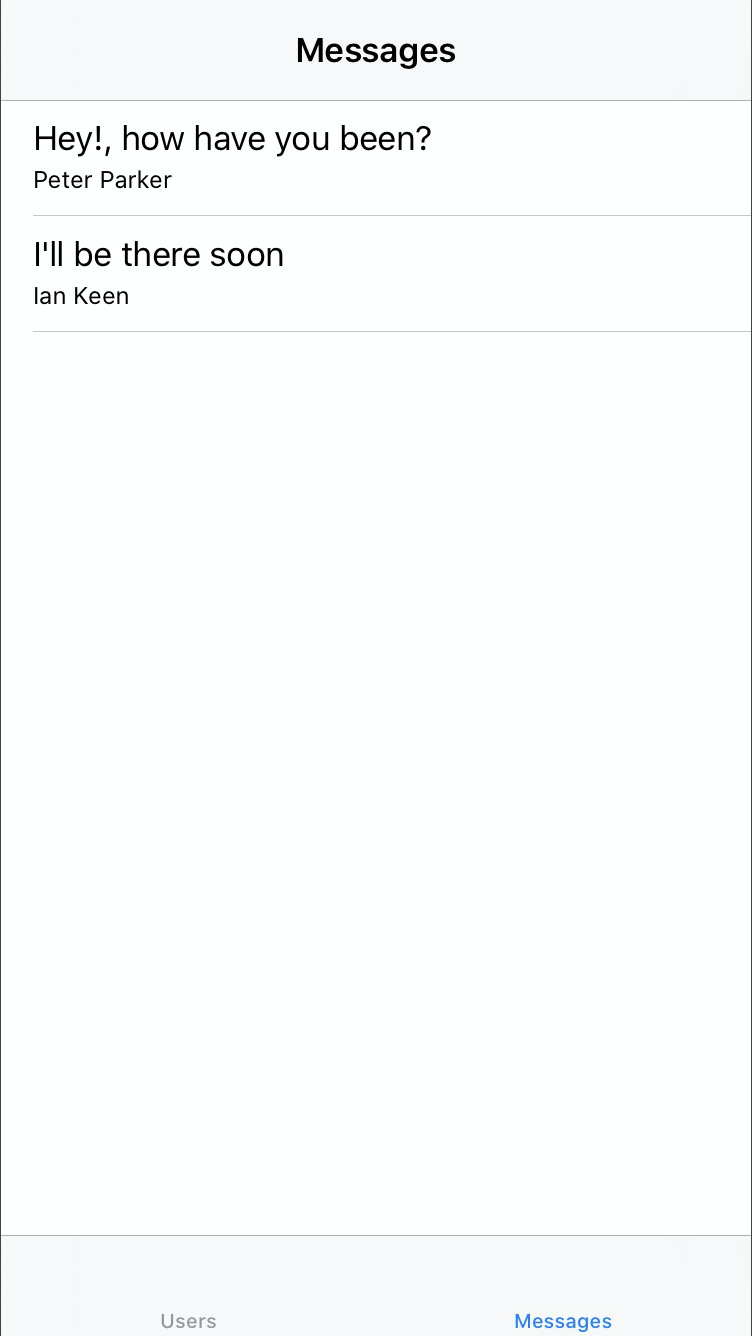 |
Notice that the UINavigationController related properties like title are handled by the UINavigationController subclasses and the UITabBarController related properties like tabItem are handled by the UITabbarController subclasses. This further decouples the individual View Controllers from the context they are being shown in.
Now that we have decoupled the hierarchy, what about navigation?
Unless you have a lot of experience with building for macOS you may have never explicitly used the Responder Chain on iOS, except perhaps the becomeFirstResponder() function.
The Responder Chain is based on the class UIResponder. All the common UIKit objects you use inherit from this including UIViewController, UIView, UIWindow, and UIApplication. There are a lot of interesting members on this class but for our needs we are only interested in one:
open var next: UIResponder? { get }
Why is this one so interesting? Well, if all the items in our view hierarchy implement this it means we basically have a linked list. From any place in the hierarchy we can walk back up the Responder Chain all the way back to the UIApplicationDelegate.
By default, next will be:
UIViews, the superview or the UIViewController if it's the root view.UIViewControllers, the containing/presenting view controller or the UIWindow if it's the root View Controller.UIWindows, the UIApplicationUIApplications, the UIApplicationDelegate if it is a UIResponderWe can even alter the chain by overriding next in our subclasses if needed! This gives us an incredibly powerful mechanism, so how can we take advantage?
Now we know what the Responder Chain is; how can we use it for navigation? Well it turns out that we can extend UIResponder with our own custom functions. We can then override these functions elsewhere to perform whatever action is required.
Knowing this, let's look at how we can navigate to a friend's details when a user taps one from the list. First let's add our UIResponder extension
extension UIResponder {
  @objc func selectedFriend(_ friend: Friend) {
    guard let next = next else {
      // This gives us a nice piece of diagnostic information in the event
      // this action travels along the chain and isn't handled by anything
      return print("⚠️ Unhandled action: \(#function), Last responder: \(self)")
    }

    next.selectedFriend(friend)
  }
}
This will expose a selectedFriend(_:) function to anything on the Responder Chain. Now that we have a way to send the message, let's do so from our friends list:
class FriendListViewController: UITableViewController {
  //..

  override func tableView(_ tableView: UITableView, didSelectRowAt indexPath: IndexPath) {
    selectedFriend(data[indexPath.row])
  }
}
Finally we need something to act on this message, so let's do that from our UINavigationController subclass:
class FriendListNavigationController: UINavigationController {
  //..

  override func selectedFriend(_ friend: Friend) {
    let viewController = FriendDetailsViewController(friend: friend)
    viewController.title = friend.name
    pushViewController(viewController, animated: true)
  }
}
And that's it! Our FriendListViewController sends a message out that a certain friend needs to be shown and nothing more. The message travels along the responder chain until it hits our UINavigationController subclass that contains the override. Our subclass then constructs the appropriate View Controller and pushes it on to the stack.
We have performed all the work of a Coordinator without re-inventing the wheel.
After putting in the work to decouple our View Controllers, how we can leverage this new pattern in our app? Let's look at how we might reuse our friends list to select a friend to use when creating a new message.
You can think of the Containers as the things that provide context or meaning to a View Controllers actions. Our existing FriendListNavigationController translates our selectedFriend action into showing a friends details on the current stack. The context here being the 'friends tab'.
For this feature we have a new context, so let's create a new Container to deal with it:
class NewMessageNavigationController: UINavigationController {
  init() {
    let viewController = FriendListViewController()
    viewController.title = "Select Recipient"
    setViewControllers([viewController], animated: false)
  }

  override func selectedFriend(_ friend: Friend) {
    let viewController = MessageComposerViewController(recipient: friend)
    viewController.title = friend.name
    setViewControllers([viewController], animated: true)
  }
}
So within this Container we start by showing the friends list, however this time when the user selects someone we will reset the stack to show the composer with the selected friend. We have used our existing friends list in a new context with very little code.
The only thing left to do is update our existing MessageListNavigationController Container to launch this new one:
class MessageListNavigationController: UINavigationController {
  init() {
    super.init(nibName: nil, bundle: nil)

    let viewController = MessageListViewController()
    viewController.title = "Messages"
    viewController.navigationItem.rightBarButtonItem = .init(title: "New", style: .plain, target: self, action: #selector(composeNewMessage))
    setViewControllers([viewController], animated: false)
  }

  //..

  @objc private func composeNewMessage() {
    let container = NewMessageNavigationController()
    present(container, animated: true, completion: nil)
  }
}
We have updated the existing Container to attach a navigation item that launches our new message composer Container. Notice that the View Controllers are still bissfully unaware of how they are being used. It is the Containers that contain the details about how they all come together.
There are a few other interesting things the Responder Chain allows us to do.
The fact that smaller components like UIView are UIResponders means they can also participate in both sending and acting on our custom actions. A UITableViewCell subclass, for example, could call our selectedFriend action rather than the View Controller.
We could also use this as a way to unify error handling. For example you might consider an extension like:
extension UIResponder {
  @objc func handleError(_ error: Error) {
    guard let next = next else {
      return print("⚠️ Unhandled action: \(#function), Last responder: \(self)")
    }

    next.handleError(error)
  }
}
Using this you can propagate errors from anywhere in your hierarchy back to a single place, like your UIWindow. Remember, the UIWindow can be a custom subclass just like your other Containers. You can present a generic error alert from there by overriding handleError.
You can also add @IBAction to your UIResponder extensions; doing this will allow you to call them with UIButton taps with no code at all.
Finally don't forget you are dealing with a linked list! Just because you override one of these custom actions doesn't mean you have to end the chain. You might want to update your UI based on the fact that an error occured but not mess with the default handling you have in your UIWindow i.e.:
class MyViewController: UIViewController {
  //..

  override func handleError(_ error: Error) {
    // do something with this controllers appearance

    next?.handleError(error) // pass the message along!
  }
}
There are a few things you need to know if you would like to give this pattern a try.
This is an Objective-C mechanism (You may have noticed the @objc on our UIResponder extensions) and as such pure Swift code is not 'visible'. This means that, by default, you cannot pass along things like structs. To work around this we can box our Swift value in an Objective-C compatible object:
public class ResponderBox: NSObject {
  @nonobjc private let value: Any

  @nonobjc public init<T>(_ value: T) {
    self.value = value
    super.init()
  }

  @nonobjc public func value<T>(_: T.Type = T.self) -> T {
    guard let value = value as? T else {
      fatalError("Invalid value. Expected \(T.self), found \(type(of: self.value))")
    }

    return value
  }
}
The unfortunate downside is that you'll need two UIResponder functions to make this work, taking our selectedFriend example we would need to update it to be:
extension UIResponder {
  @objc func selectedFriend(_ friend: ResponderBox) {
    guard let next = next else {
      return print("⚠️ Unhandled action: \(#function), Last responder: \(self)")
    }

    next.selectedFriend(friend)
  }
  func selectedFriend(_ friend: Friend) {
    selectedFriend(.init(friend))
  }
}
For the objects sending the action nothing changes. They can still call selectedFriend(someFriendStruct). This function will then box up the struct and call out to the Objective-C compatible version.
For the objects wanting to act on this they would instead now override the ResponderBox version and extract the underlying struct with code like:
override func selectedFriend(_ friend: ResponderBox) {
  let friend: Friend = friend.value()

  // use friend struct
}
This is a small inconveience, however the good news is you can't really mess this up. For sending it doesn't matter if you accidentally called the ResponderBox version as they both result in the action being sent along the Responder Chain. As for the overrides, you can only override the ResponderBox version thanks to the @objc annotation. If you tried to override the struct version the compiler would give you an error.
In the same way I only move forward using the Containers, I also only move backwards using them. One of the rules I follow is that "the Container that presented something should also dismiss it". However iOS throws a spanner in that by default because regardless of what does the presenting, the window's rootViewController is the value returned by the presented items next value.
What this means in our example is; Our presented NewMessageNavigationController would return the HomeTabController as its next responder instead of the MessageListNavigationController that presented it.
Luckily we can work around this also using View Controller Containment:
class ResponderController: UIViewController {
  private let nextOverride: UIResponder
  private let child: UIViewController

  init(containing: UIViewController, nextResponder: UIResponder) {
    self.nextOverride = nextResponder
    self.child = containing
    super.init(nibName: nil, bundle: nil)
  }
  required init?(coder: NSCoder) {
    fatalError("init(coder:) has not been implemented")
  }

  override func viewDidLoad() {
    super.viewDidLoad()
    addChild(child)
    view.addSubview(child.view)

    child.view.frame = view.bounds
    child.view.autoresizingMask = [.flexibleWidth, .flexibleHeight]

    child.didMove(toParent: self)
  }
  override var next: UIResponder? {
    return nextOverride
  }
}

extension UIViewController {
    func presentModal(_ viewControllerToPresent: UIViewController, animated flag: Bool, completion: (() -> Void)? = nil) {
        let wrapper = ResponderController(containing: viewControllerToPresent, nextResponder: self)
        present(wrapper, animated: flag, completion: completion)
    }
}
By overriding next we can maintain a Responder Chain that matches how we actually construct the UI hierarchy. All you need to do is use presentModal(_:animated:completion:) instead of the usual present(_:animated:completion:) function.
If you made it this far you probably have the idea but just to recap the rules I like to use when working with this pattern:
title, navigationItems and tabBarItemsMuch like the more common Coordinator pattern this certainly isn't a silver bullet. However I have had really good success using it a number of apps so I'd love to hear your feedback if you decide to try it. There are some quirks but overall I find it easier to lean into UIKit rather than try to fight it.


